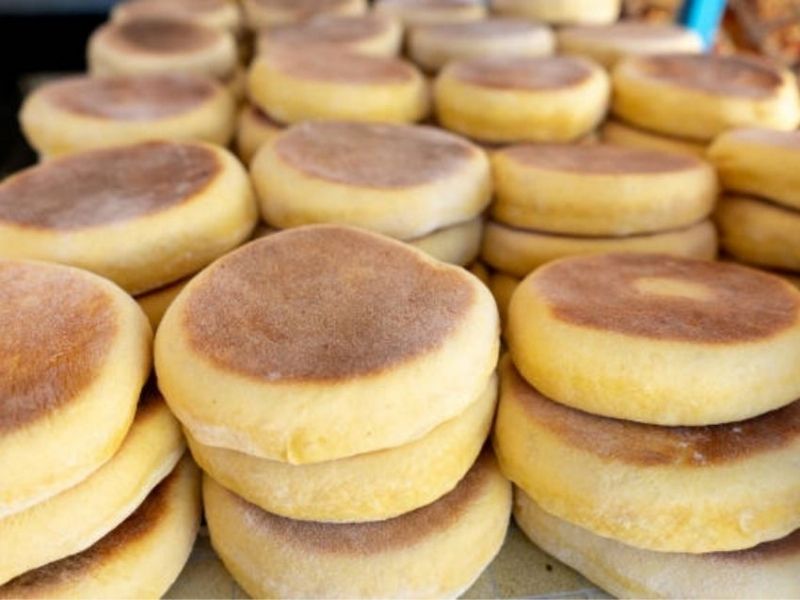
The gorditas de nata is a traditional dessert dish in Mexico. It is a sweet cake that resembles a tiny yet very thick pancake. It is prepared using clotted cream (called “Nata” in Mexico) from milk, sugar, white wheat flour, and cinnamon. The dish is a famous street and market treat across Mexico City.
Gorditas de Nata has an appearance close to that of the Mexican tortilla, but the gorditas de Nata is relatively thicker. The diameter can range between 4 and 12 centimeters. The seasoning may vary depending on which region of the country.
Although you may not miss them on various streets and corners of Mexico City, these treats are gradually disappearing. Those in many streets lack the vital ingredient, nata (clotted cream). In this article, I will share with you the original recipe so you can enjoy the rich and classic Gorditas de Nata. I will also share how to make the nata first, and then we will use it to make the gorditas.
Gorditas De Nata Mexico (Origin and History)
While it is somewhat hard to trace the exact origin, most texts suggest that Gorditas de Nata may have evolved from the Mexican pre-historic culinary. In pre-Hispanic Mexico, a great diversity of tortillas were made possible by mixing corn with different ingredients.
Wheat was not yet available in Mexico until after the country’s colonization. The original dish may have been prepared with masa and stuffed with meat, cheese, or other fillings. The dish Gorditas de Nata was born after introducing European ingredients into the country.
Others believe that gorditas de nata may have originated in Pachuca Hidalgo. The dish was among the many party bread consumed during town fairs. Some creative traders came up with the idea of packaging gorditas de nata in small bags (containing five or ten pieces).
They then sold the wrapped snacks to the foreign truck and private car drivers and passengers stuck in traffic on the Mexico-Pachuca highway during road closures. Today, you will still find some people selling gorditas de Nata in the streets of Mexico City.
Traditionally, the dish was commonly consumed during the marking of the day of Our Lady of Guadalupe, celebrated on December 12. Lady Guadalupe is a pre-Hispanic female fertility deity connected to the earth on the Tepeyac hill. The partakers of the faith later changed her name to the Virgin of Guadalupe.
Gorditas de Nata and various corn-derived dishes were among the food offerings offered during the celebration. For this reason, you will find some people referring to the dish as Gorditas Guadalupanas. As of 1895, the Guadalupe pilgrims visiting the Basilica of Santa Maria de Guadalupe preferred to eat gorditas de Nata prepared by the town’s inhabitants.
Today, the dish is a typical snack and breakfast dish across eastern and central Mexico. It is sweet with a light flavor, and many people love to accompany it with a hot beverage. The significant difference that makes Gorditas de Nata stand out from other Gorditas and buns is the cream in the recipe. Many desserts use whipping cream, but I am not alluding to whipping cream for this recipe, but clotted cream.
Gorditas De Nata Sinaloa
Gorditas de Nata Sinaloa is a delicious fatty nata bits prepared according to the Sinaloa style. They are pretty similar in appearance but differ in the leavening agent used. The same ingredients used in gorditas de nata are used in Sinaloa gorditas.
However, the Sinaloa recipe uses yeast (unlike baking powder or soda used in Gorditas de Nata) as the leavening agent. Both are cooked on a non-stick griddle or skillet without adding any oil.
Gorditas De Nata Michoacan
These gorditas de nata may have their origin in Michoacan. While they may resemble other Gorditas, this one is unique, thanks to the vanilla flavor included in the recipe. You are free to add or leave out sour cream or liquid milk for this recipe as you find it necessary. Unlike the Sinaloa variety, this recipe uses baking soda and baking powder as leavening agents.

Gorditas De Nata Recipe
Let us start with the nata; remember, it is an essential ingredient for the original Gorditas de Nata. Maybe you are wondering; what is Nata? Nata is a spreadable form of heavy cream derived from raw cow milk. It is clotted cream, the layer of fat you skim from milk after boiling and cooling it.
Preparing clotted milk takes a long time but is primarily hands of and worth the wait – it creates a delicious flavor in these fatty gorditas. It is important to note that the yield per liter of milk is not that much, which explains why you get it at a higher price from the stores.
Ingredients for the Nata
- 1 lt heavy cream high-fat content (not ultra-pasteurized)
Preparation
- Preheat your over to about 1750F/800C
- Transfer the cream into a shallow oven-safe dish or casserole. Preferably, use a container with a large surface area to get reasonable amounts of clotted cream.
- Place the dish and its contents in the oven – ensure it is at the center and uncovered—bake for 12 hours. I prefer to do this overnight (it is easier), so it is set in the morning. You want to ensure your oven will not switch off after a given amount of time.
- After 12 hours have elapsed, the cream will develop skin. Remove from the oven. The product may appear bubbly with a yellow surface. Yes, this is how your clotted milk will look.
- Set aside and let the clotted milk cool. Cover it and put it in the refrigerator for 8 hours. This allows it to set.
- After chilling, carefully spoon off the thick and firm layer of clotted cream on top and transfer it into a clean jar. Leave the separated liquid behind (You can save this liquid for other recipes)
- Gently stir the scooped clotted cream until it develops a smooth texture. If the cream is thicker than you prefer, you can add a little of the separated liquid back to the cream until it forms to your desired consistency.
- Store the sealed jar in the fridge. Clotted cream can stay refrigerated for up to five days and frozen for up to a fortnight.
Ingredients
- 200 grams (7 oz.) clotted cream (nata) – we prepared this above.
- 500 grams (17.6 oz.) all-purpose flour
- 175 grams (6 oz.) sugar
- 2 eggs
- 1½ teaspoon baking soda
- 1½ teaspoon baking powder
- ½ teaspoon cinnamon (ground)
- ½ teaspoon salt
Preparation
- Add the nata into a sizeable bowl and whisk until a bit fluffy. Add the vanilla and eggs, and mix well. Once well integrated, add sugar and mix.
- Sift the dry ingredients – flour, baking soda, baking powder, cinnamon, and salt – into a medium-sized bowl. Add this gradually to the mixture of wet ingredients in step one. Mix with a spoon until it is no longer easy to mix. Now knead with your hands until you make a soft dough with a smooth texture.
- Cover the dough using a plastic bag. Refrigerate the dough for at least thirty minutes or leave it overnight.
- Remove the dough from the refrigerator. Sprinkle some flour to dust a smooth surface. Spread the dough on the surface and knead until the dough is about 1 cm thick.
- Cut the dough using a round (approximately seven cm in diameter) cookie cutter.
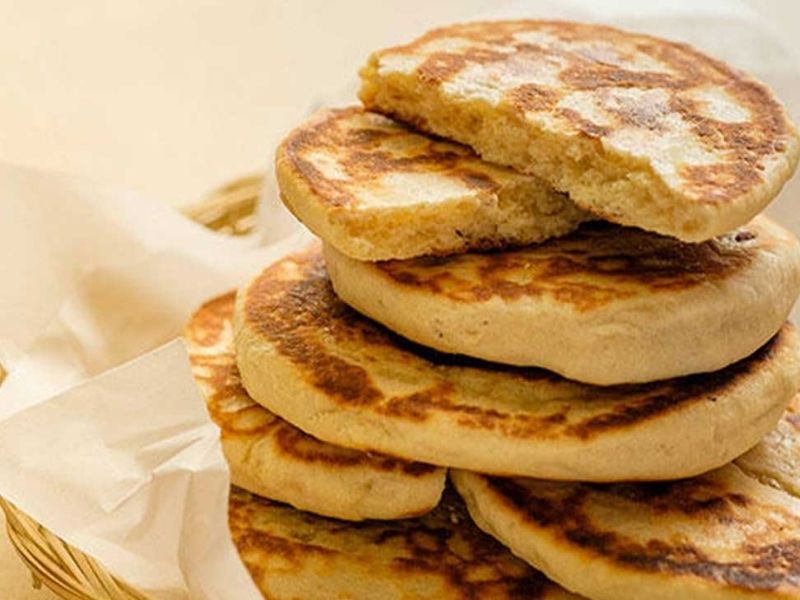
- Heat a non-stick pan over low heat. Place the cut dough on the pan and flip while it looks somewhat raw. This allows the dough to rise well. Flip again and cook until it is fully puffed up. It should take approximately five minutes on each side.
- Serve with hot coffee or your favorite hot beverage – tea, coffee, milk, chocolate, or atole. You can pair the treats with jam or Dulce de leche, but they are rich in flavor and often do not require any additions.
You can make these tasty treats whenever you want. They are pretty easy to make, and the ingredients are readily available in your local stores.
Important Notes and Tips
Ensure your cream is not ultra-pasteurized. Use regular pasteurized cream; ultra-pasteurized cream undergoes a treatment process that prevents it from clotting. You can even get better results if you use raw or freshly milked milk.
An oven thermometer is a convenient kitchen tool in the clotting recipe. If your oven does not maintain the ideal temperature, your cream will not clot.
Some ovens have an inbuilt safety feature that turns them off after prolonged periods. For such ovens, you may prefer to clot your cream during the day, when you can monitor and keep your oven on during the entire 12 hours.
Do not doubt yourself if you get yellowish cream. This is okay, especially for clotted milk prepared at home. The cream contains high amounts of butterfat, contributing to the final product’s pale yellow color.
Popular Articles About Traditional and Authentic Mexican Food
Birria Consome – Discover this trending Mexican Dish [with Recipe]
Flancocho – Discover this South American Delicate Dessert [with Recipe]
–
go back to American Cuisine